 # YOLOv5 with Comet
This guide will cover how to use YOLOv5 with [Comet](https://bit.ly/yolov5-readme-comet2)
# About Comet
Comet builds tools that help data scientists, engineers, and team leaders accelerate and optimize machine learning and deep learning models.
Track and visualize model metrics in real time, save your hyperparameters, datasets, and model checkpoints, and visualize your model predictions with [Comet Custom Panels](https://www.comet.com/docs/v2/guides/comet-dashboard/code-panels/about-panels/?utm_source=yolov5&utm_medium=partner&utm_campaign=partner_yolov5_2022&utm_content=github)!
Comet makes sure you never lose track of your work and makes it easy to share results and collaborate across teams of all sizes!
# Getting Started
## Install Comet
```shell
pip install comet_ml
```
## Configure Comet Credentials
There are two ways to configure Comet with YOLOv5.
You can either set your credentials through environment variables
**Environment Variables**
```shell
export COMET_API_KEY=
export COMET_PROJECT_NAME= # This will default to 'yolov5'
```
Or create a `.comet.config` file in your working directory and set your credentials there.
**Comet Configuration File**
```
[comet]
api_key=
project_name= # This will default to 'yolov5'
```
## Run the Training Script
```shell
# Train YOLOv5s on COCO128 for 5 epochs
python train.py --img 640 --batch 16 --epochs 5 --data coco128.yaml --weights yolov5s.pt
```
That's it! Comet will automatically log your hyperparameters, command line arguments, training and validation metrics. You can visualize and analyze your runs in the Comet UI
# YOLOv5 with Comet
This guide will cover how to use YOLOv5 with [Comet](https://bit.ly/yolov5-readme-comet2)
# About Comet
Comet builds tools that help data scientists, engineers, and team leaders accelerate and optimize machine learning and deep learning models.
Track and visualize model metrics in real time, save your hyperparameters, datasets, and model checkpoints, and visualize your model predictions with [Comet Custom Panels](https://www.comet.com/docs/v2/guides/comet-dashboard/code-panels/about-panels/?utm_source=yolov5&utm_medium=partner&utm_campaign=partner_yolov5_2022&utm_content=github)!
Comet makes sure you never lose track of your work and makes it easy to share results and collaborate across teams of all sizes!
# Getting Started
## Install Comet
```shell
pip install comet_ml
```
## Configure Comet Credentials
There are two ways to configure Comet with YOLOv5.
You can either set your credentials through environment variables
**Environment Variables**
```shell
export COMET_API_KEY=
export COMET_PROJECT_NAME= # This will default to 'yolov5'
```
Or create a `.comet.config` file in your working directory and set your credentials there.
**Comet Configuration File**
```
[comet]
api_key=
project_name= # This will default to 'yolov5'
```
## Run the Training Script
```shell
# Train YOLOv5s on COCO128 for 5 epochs
python train.py --img 640 --batch 16 --epochs 5 --data coco128.yaml --weights yolov5s.pt
```
That's it! Comet will automatically log your hyperparameters, command line arguments, training and validation metrics. You can visualize and analyze your runs in the Comet UI
 # Try out an Example!
Check out an example of a [completed run here](https://www.comet.com/examples/comet-example-yolov5/a0e29e0e9b984e4a822db2a62d0cb357?experiment-tab=chart&showOutliers=true&smoothing=0&transformY=smoothing&xAxis=step&utm_source=yolov5&utm_medium=partner&utm_campaign=partner_yolov5_2022&utm_content=github)
Or better yet, try it out yourself in this Colab Notebook
[](https://colab.research.google.com/drive/1RG0WOQyxlDlo5Km8GogJpIEJlg_5lyYO?usp=sharing)
# Log automatically
By default, Comet will log the following items
## Metrics
- Box Loss, Object Loss, Classification Loss for the training and validation data
- mAP_0.5, mAP_0.5:0.95 metrics for the validation data.
- Precision and Recall for the validation data
## Parameters
- Model Hyperparameters
- All parameters passed through the command line options
## Visualizations
- Confusion Matrix of the model predictions on the validation data
- Plots for the PR and F1 curves across all classes
- Correlogram of the Class Labels
# Configure Comet Logging
Comet can be configured to log additional data either through command line flags passed to the training script
or through environment variables.
```shell
export COMET_MODE=online # Set whether to run Comet in 'online' or 'offline' mode. Defaults to online
export COMET_MODEL_NAME= #Set the name for the saved model. Defaults to yolov5
export COMET_LOG_CONFUSION_MATRIX=false # Set to disable logging a Comet Confusion Matrix. Defaults to true
export COMET_MAX_IMAGE_UPLOADS= # Controls how many total image predictions to log to Comet. Defaults to 100.
export COMET_LOG_PER_CLASS_METRICS=true # Set to log evaluation metrics for each detected class at the end of training. Defaults to false
export COMET_DEFAULT_CHECKPOINT_FILENAME= # Set this if you would like to resume training from a different checkpoint. Defaults to 'last.pt'
export COMET_LOG_BATCH_LEVEL_METRICS=true # Set this if you would like to log training metrics at the batch level. Defaults to false.
export COMET_LOG_PREDICTIONS=true # Set this to false to disable logging model predictions
```
## Logging Checkpoints with Comet
Logging Models to Comet is disabled by default. To enable it, pass the `save-period` argument to the training script. This will save the
logged checkpoints to Comet based on the interval value provided by `save-period`
```shell
python train.py \
--img 640 \
--batch 16 \
--epochs 5 \
--data coco128.yaml \
--weights yolov5s.pt \
--save-period 1
```
## Logging Model Predictions
By default, model predictions (images, ground truth labels and bounding boxes) will be logged to Comet.
You can control the frequency of logged predictions and the associated images by passing the `bbox_interval` command line argument. Predictions can be visualized using Comet's Object Detection Custom Panel. This frequency corresponds to every Nth batch of data per epoch. In the example below, we are logging every 2nd batch of data for each epoch.
**Note:** The YOLOv5 validation dataloader will default to a batch size of 32, so you will have to set the logging frequency accordingly.
Here is an [example project using the Panel](https://www.comet.com/examples/comet-example-yolov5?shareable=YcwMiJaZSXfcEXpGOHDD12vA1&utm_source=yolov5&utm_medium=partner&utm_campaign=partner_yolov5_2022&utm_content=github)
```shell
python train.py \
--img 640 \
--batch 16 \
--epochs 5 \
--data coco128.yaml \
--weights yolov5s.pt \
--bbox_interval 2
```
### Controlling the number of Prediction Images logged to Comet
When logging predictions from YOLOv5, Comet will log the images associated with each set of predictions. By default a maximum of 100 validation images are logged. You can increase or decrease this number using the `COMET_MAX_IMAGE_UPLOADS` environment variable.
```shell
env COMET_MAX_IMAGE_UPLOADS=200 python train.py \
--img 640 \
--batch 16 \
--epochs 5 \
--data coco128.yaml \
--weights yolov5s.pt \
--bbox_interval 1
```
### Logging Class Level Metrics
Use the `COMET_LOG_PER_CLASS_METRICS` environment variable to log mAP, precision, recall, f1 for each class.
```shell
env COMET_LOG_PER_CLASS_METRICS=true python train.py \
--img 640 \
--batch 16 \
--epochs 5 \
--data coco128.yaml \
--weights yolov5s.pt
```
## Uploading a Dataset to Comet Artifacts
If you would like to store your data using [Comet Artifacts](https://www.comet.com/docs/v2/guides/data-management/using-artifacts/#learn-more?utm_source=yolov5&utm_medium=partner&utm_campaign=partner_yolov5_2022&utm_content=github), you can do so using the `upload_dataset` flag.
The dataset be organized in the way described in the [YOLOv5 documentation](https://docs.ultralytics.com/tutorials/train-custom-datasets/#3-organize-directories). The dataset config `yaml` file must follow the same format as that of the `coco128.yaml` file.
```shell
python train.py \
--img 640 \
--batch 16 \
--epochs 5 \
--data coco128.yaml \
--weights yolov5s.pt \
--upload_dataset
```
You can find the uploaded dataset in the Artifacts tab in your Comet Workspace
# Try out an Example!
Check out an example of a [completed run here](https://www.comet.com/examples/comet-example-yolov5/a0e29e0e9b984e4a822db2a62d0cb357?experiment-tab=chart&showOutliers=true&smoothing=0&transformY=smoothing&xAxis=step&utm_source=yolov5&utm_medium=partner&utm_campaign=partner_yolov5_2022&utm_content=github)
Or better yet, try it out yourself in this Colab Notebook
[](https://colab.research.google.com/drive/1RG0WOQyxlDlo5Km8GogJpIEJlg_5lyYO?usp=sharing)
# Log automatically
By default, Comet will log the following items
## Metrics
- Box Loss, Object Loss, Classification Loss for the training and validation data
- mAP_0.5, mAP_0.5:0.95 metrics for the validation data.
- Precision and Recall for the validation data
## Parameters
- Model Hyperparameters
- All parameters passed through the command line options
## Visualizations
- Confusion Matrix of the model predictions on the validation data
- Plots for the PR and F1 curves across all classes
- Correlogram of the Class Labels
# Configure Comet Logging
Comet can be configured to log additional data either through command line flags passed to the training script
or through environment variables.
```shell
export COMET_MODE=online # Set whether to run Comet in 'online' or 'offline' mode. Defaults to online
export COMET_MODEL_NAME= #Set the name for the saved model. Defaults to yolov5
export COMET_LOG_CONFUSION_MATRIX=false # Set to disable logging a Comet Confusion Matrix. Defaults to true
export COMET_MAX_IMAGE_UPLOADS= # Controls how many total image predictions to log to Comet. Defaults to 100.
export COMET_LOG_PER_CLASS_METRICS=true # Set to log evaluation metrics for each detected class at the end of training. Defaults to false
export COMET_DEFAULT_CHECKPOINT_FILENAME= # Set this if you would like to resume training from a different checkpoint. Defaults to 'last.pt'
export COMET_LOG_BATCH_LEVEL_METRICS=true # Set this if you would like to log training metrics at the batch level. Defaults to false.
export COMET_LOG_PREDICTIONS=true # Set this to false to disable logging model predictions
```
## Logging Checkpoints with Comet
Logging Models to Comet is disabled by default. To enable it, pass the `save-period` argument to the training script. This will save the
logged checkpoints to Comet based on the interval value provided by `save-period`
```shell
python train.py \
--img 640 \
--batch 16 \
--epochs 5 \
--data coco128.yaml \
--weights yolov5s.pt \
--save-period 1
```
## Logging Model Predictions
By default, model predictions (images, ground truth labels and bounding boxes) will be logged to Comet.
You can control the frequency of logged predictions and the associated images by passing the `bbox_interval` command line argument. Predictions can be visualized using Comet's Object Detection Custom Panel. This frequency corresponds to every Nth batch of data per epoch. In the example below, we are logging every 2nd batch of data for each epoch.
**Note:** The YOLOv5 validation dataloader will default to a batch size of 32, so you will have to set the logging frequency accordingly.
Here is an [example project using the Panel](https://www.comet.com/examples/comet-example-yolov5?shareable=YcwMiJaZSXfcEXpGOHDD12vA1&utm_source=yolov5&utm_medium=partner&utm_campaign=partner_yolov5_2022&utm_content=github)
```shell
python train.py \
--img 640 \
--batch 16 \
--epochs 5 \
--data coco128.yaml \
--weights yolov5s.pt \
--bbox_interval 2
```
### Controlling the number of Prediction Images logged to Comet
When logging predictions from YOLOv5, Comet will log the images associated with each set of predictions. By default a maximum of 100 validation images are logged. You can increase or decrease this number using the `COMET_MAX_IMAGE_UPLOADS` environment variable.
```shell
env COMET_MAX_IMAGE_UPLOADS=200 python train.py \
--img 640 \
--batch 16 \
--epochs 5 \
--data coco128.yaml \
--weights yolov5s.pt \
--bbox_interval 1
```
### Logging Class Level Metrics
Use the `COMET_LOG_PER_CLASS_METRICS` environment variable to log mAP, precision, recall, f1 for each class.
```shell
env COMET_LOG_PER_CLASS_METRICS=true python train.py \
--img 640 \
--batch 16 \
--epochs 5 \
--data coco128.yaml \
--weights yolov5s.pt
```
## Uploading a Dataset to Comet Artifacts
If you would like to store your data using [Comet Artifacts](https://www.comet.com/docs/v2/guides/data-management/using-artifacts/#learn-more?utm_source=yolov5&utm_medium=partner&utm_campaign=partner_yolov5_2022&utm_content=github), you can do so using the `upload_dataset` flag.
The dataset be organized in the way described in the [YOLOv5 documentation](https://docs.ultralytics.com/tutorials/train-custom-datasets/#3-organize-directories). The dataset config `yaml` file must follow the same format as that of the `coco128.yaml` file.
```shell
python train.py \
--img 640 \
--batch 16 \
--epochs 5 \
--data coco128.yaml \
--weights yolov5s.pt \
--upload_dataset
```
You can find the uploaded dataset in the Artifacts tab in your Comet Workspace
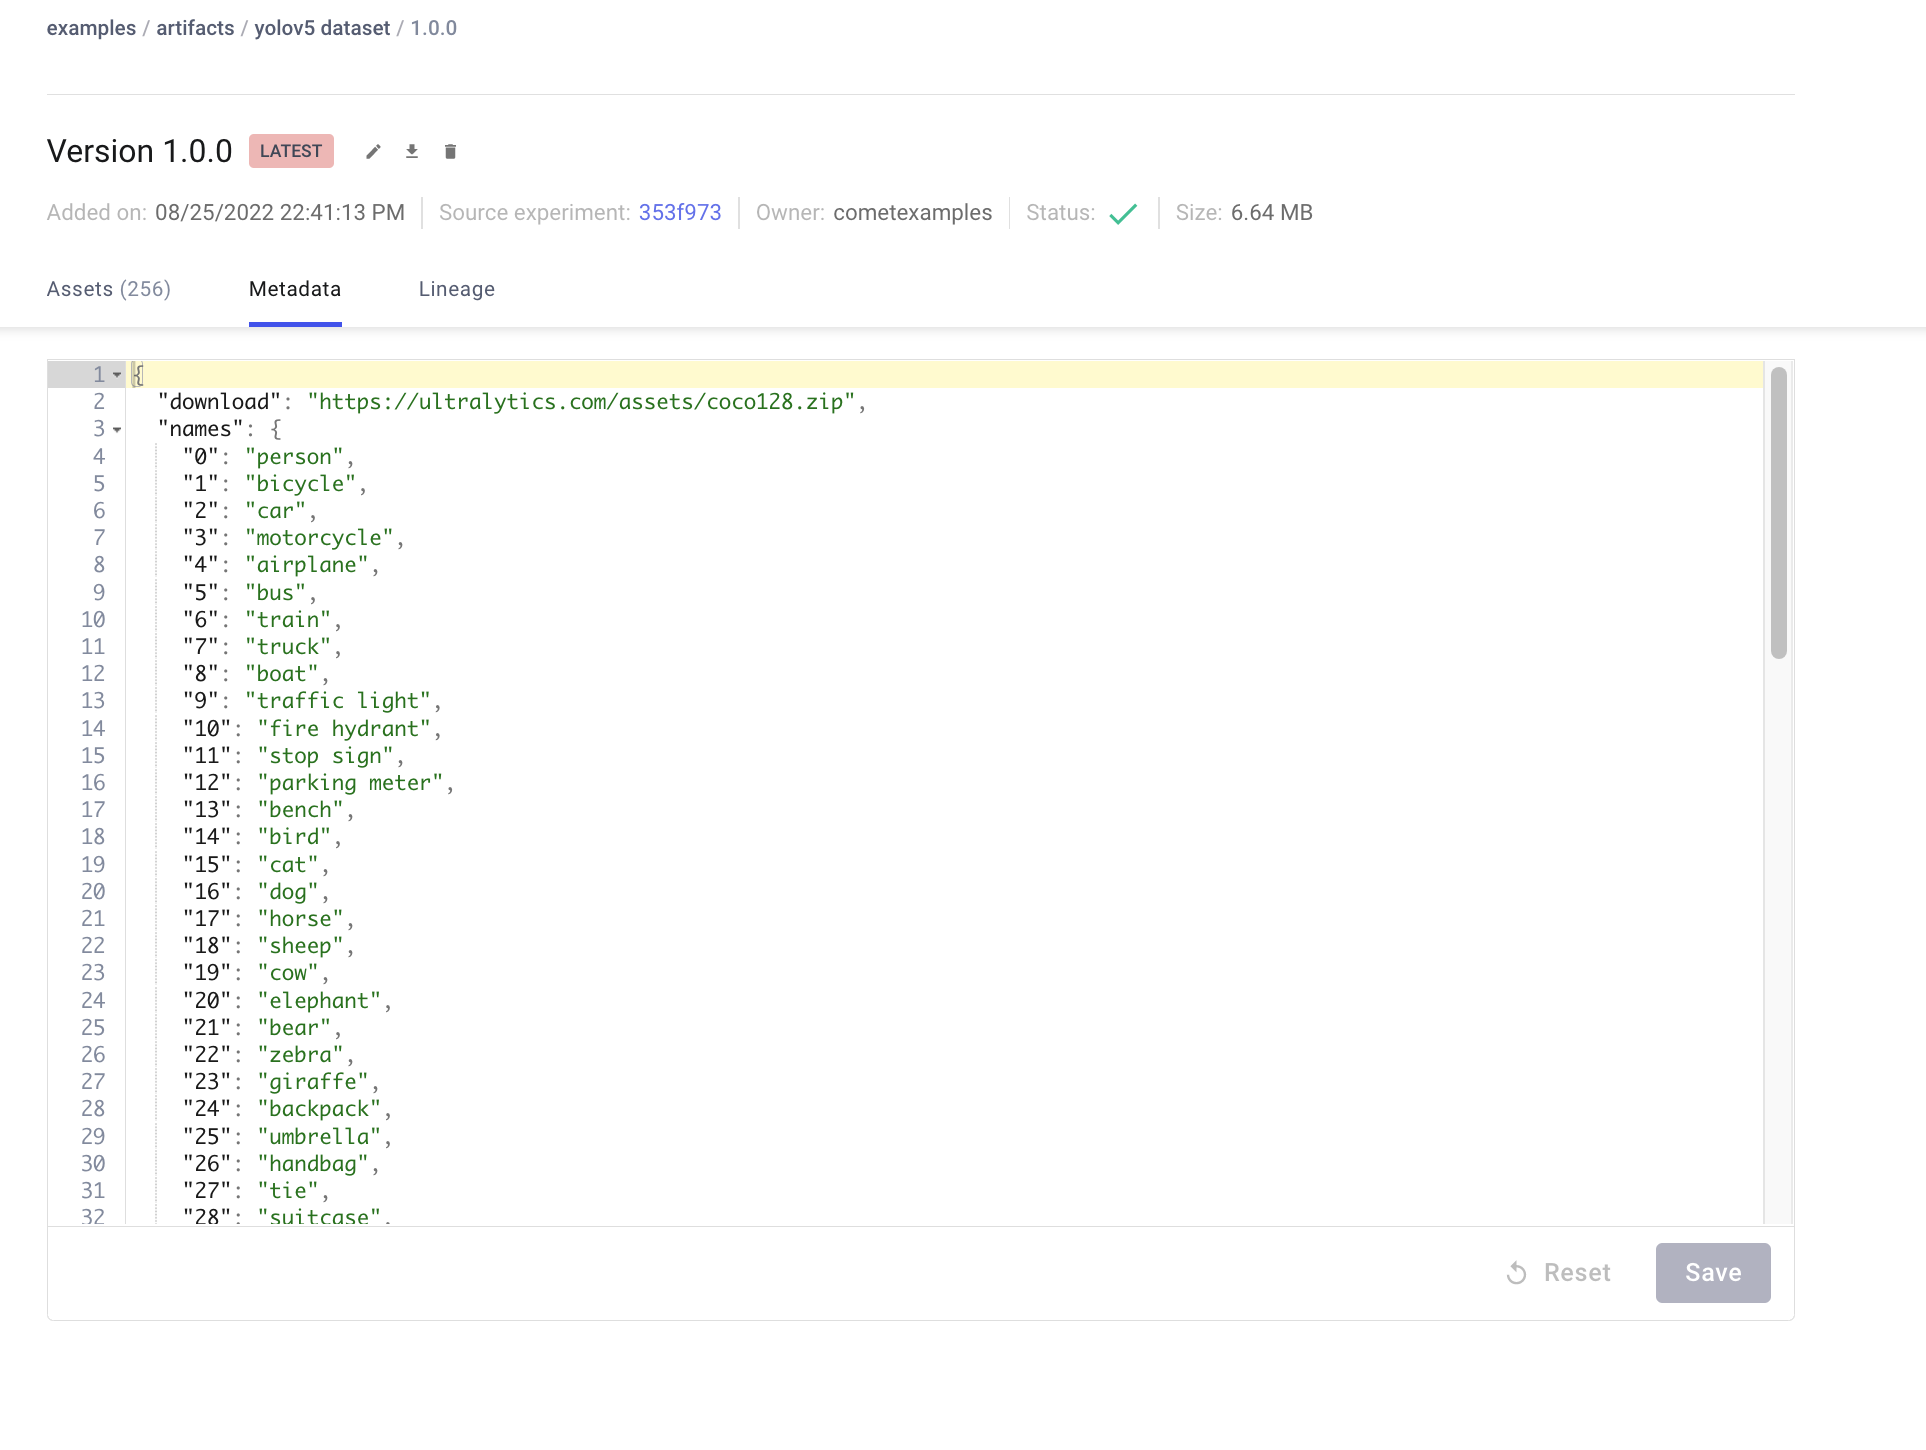
 You can preview the data directly in the Comet UI.
 Artifacts are versioned and also support adding metadata about the dataset. Comet will automatically log the metadata from your dataset `yaml` file
 ### Using a saved Artifact
If you would like to use a dataset from Comet Artifacts, set the `path` variable in your dataset `yaml` file to point to the following Artifact resource URL.
```
# contents of artifact.yaml file
path: "comet:///:"
```
Then pass this file to your training script in the following way
```shell
python train.py \
--img 640 \
--batch 16 \
--epochs 5 \
--data artifact.yaml \
--weights yolov5s.pt
```
Artifacts also allow you to track the lineage of data as it flows through your Experimentation workflow. Here you can see a graph that shows you all the experiments that have used your uploaded dataset.
### Using a saved Artifact
If you would like to use a dataset from Comet Artifacts, set the `path` variable in your dataset `yaml` file to point to the following Artifact resource URL.
```
# contents of artifact.yaml file
path: "comet:///:"
```
Then pass this file to your training script in the following way
```shell
python train.py \
--img 640 \
--batch 16 \
--epochs 5 \
--data artifact.yaml \
--weights yolov5s.pt
```
Artifacts also allow you to track the lineage of data as it flows through your Experimentation workflow. Here you can see a graph that shows you all the experiments that have used your uploaded dataset.
 ## Resuming a Training Run
If your training run is interrupted for any reason, e.g. disrupted internet connection, you can resume the run using the `resume` flag and the Comet Run Path.
The Run Path has the following format `comet:////`.
This will restore the run to its state before the interruption, which includes restoring the model from a checkpoint, restoring all hyperparameters and training arguments and downloading Comet dataset Artifacts if they were used in the original run. The resumed run will continue logging to the existing Experiment in the Comet UI
```shell
python train.py \
--resume "comet://"
```
## Hyperparameter Search with the Comet Optimizer
YOLOv5 is also integrated with Comet's Optimizer, making is simple to visualize hyperparameter sweeps in the Comet UI.
### Configuring an Optimizer Sweep
To configure the Comet Optimizer, you will have to create a JSON file with the information about the sweep. An example file has been provided in `utils/loggers/comet/optimizer_config.json`
```shell
python utils/loggers/comet/hpo.py \
--comet_optimizer_config "utils/loggers/comet/optimizer_config.json"
```
The `hpo.py` script accepts the same arguments as `train.py`. If you wish to pass additional arguments to your sweep simply add them after
the script.
```shell
python utils/loggers/comet/hpo.py \
--comet_optimizer_config "utils/loggers/comet/optimizer_config.json" \
--save-period 1 \
--bbox_interval 1
```
### Running a Sweep in Parallel
```shell
comet optimizer -j utils/loggers/comet/hpo.py \
utils/loggers/comet/optimizer_config.json"
```
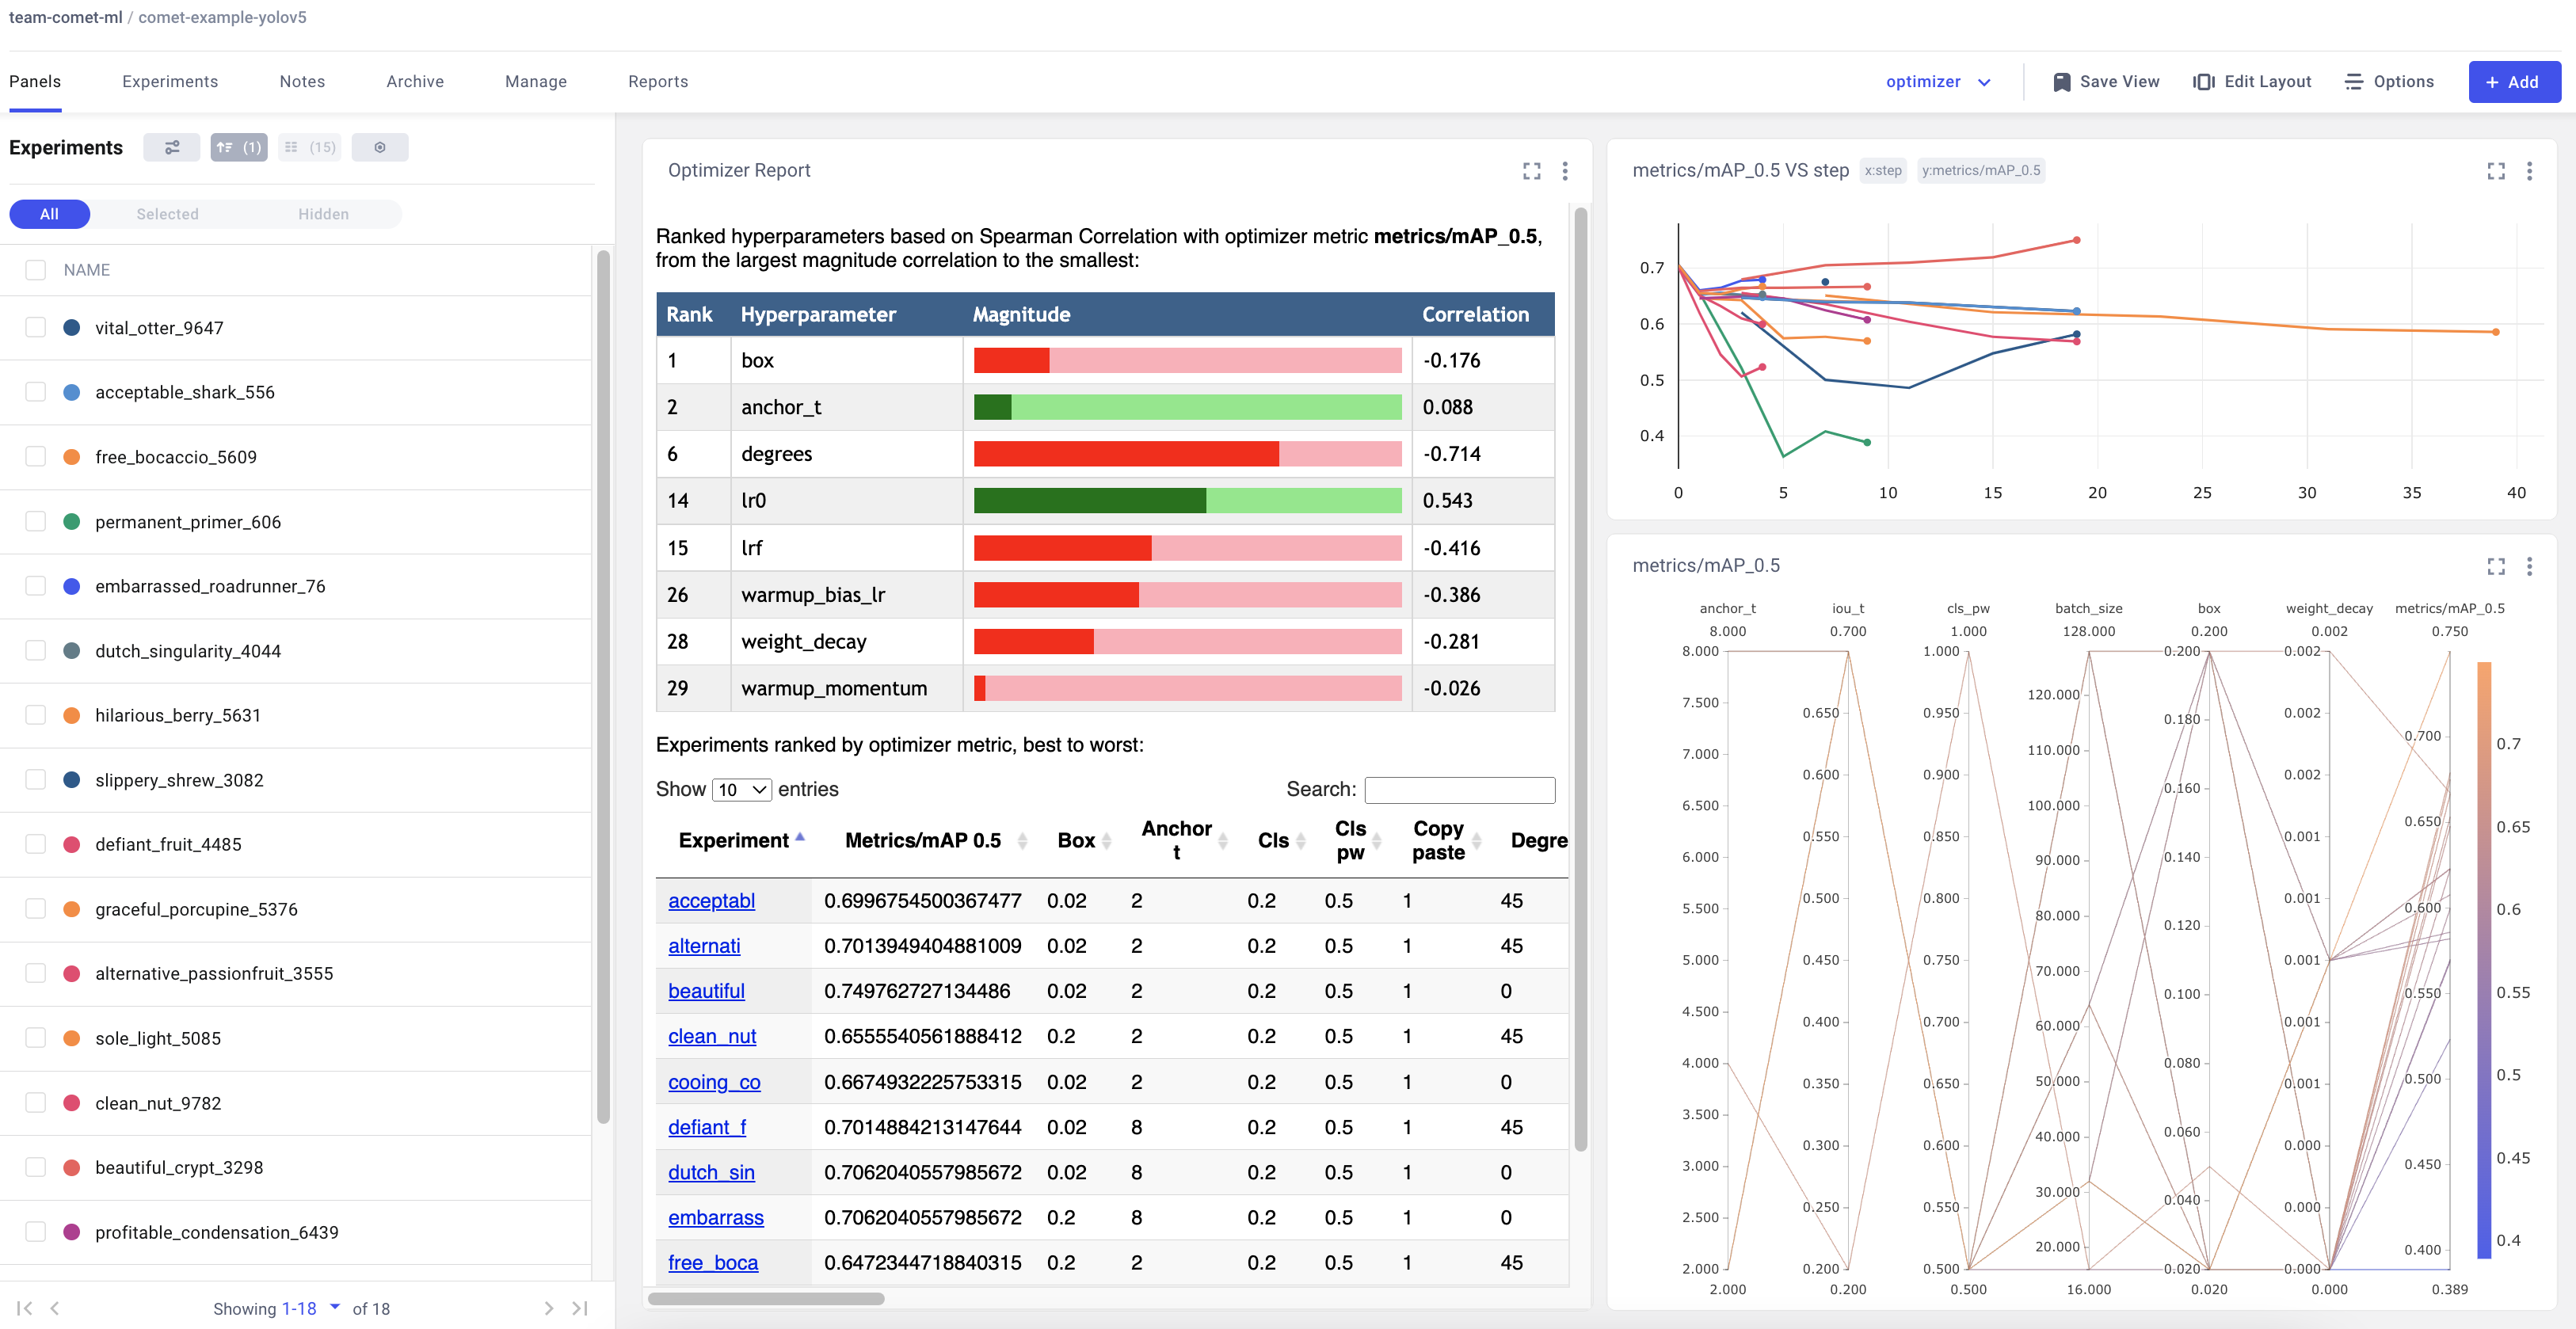
### Visualizing Results
Comet provides a number of ways to visualize the results of your sweep. Take a look at a [project with a completed sweep here](https://www.comet.com/examples/comet-example-yolov5/view/PrlArHGuuhDTKC1UuBmTtOSXD/panels?utm_source=yolov5&utm_medium=partner&utm_campaign=partner_yolov5_2022&utm_content=github)
## Resuming a Training Run
If your training run is interrupted for any reason, e.g. disrupted internet connection, you can resume the run using the `resume` flag and the Comet Run Path.
The Run Path has the following format `comet:////`.
This will restore the run to its state before the interruption, which includes restoring the model from a checkpoint, restoring all hyperparameters and training arguments and downloading Comet dataset Artifacts if they were used in the original run. The resumed run will continue logging to the existing Experiment in the Comet UI
```shell
python train.py \
--resume "comet://"
```
## Hyperparameter Search with the Comet Optimizer
YOLOv5 is also integrated with Comet's Optimizer, making is simple to visualize hyperparameter sweeps in the Comet UI.
### Configuring an Optimizer Sweep
To configure the Comet Optimizer, you will have to create a JSON file with the information about the sweep. An example file has been provided in `utils/loggers/comet/optimizer_config.json`
```shell
python utils/loggers/comet/hpo.py \
--comet_optimizer_config "utils/loggers/comet/optimizer_config.json"
```
The `hpo.py` script accepts the same arguments as `train.py`. If you wish to pass additional arguments to your sweep simply add them after
the script.
```shell
python utils/loggers/comet/hpo.py \
--comet_optimizer_config "utils/loggers/comet/optimizer_config.json" \
--save-period 1 \
--bbox_interval 1
```
### Running a Sweep in Parallel
```shell
comet optimizer -j utils/loggers/comet/hpo.py \
utils/loggers/comet/optimizer_config.json"
```
### Visualizing Results
Comet provides a number of ways to visualize the results of your sweep. Take a look at a [project with a completed sweep here](https://www.comet.com/examples/comet-example-yolov5/view/PrlArHGuuhDTKC1UuBmTtOSXD/panels?utm_source=yolov5&utm_medium=partner&utm_campaign=partner_yolov5_2022&utm_content=github)